Infrastructure in C# using the Azure Management SDK
Infrastructure in C# using the Azure Management SDK
I have wanted to this post for some time, and I thought today would be the day. If you have been a reader of my blog, then you would know that I am an advocate of using alternatives to Azure ARM templates. My favorite tool is Terraform. However, I acknowledge that many people would like to use C# to manage their infrastructure as code. There are other solutions out there, and I would encourage that you give them all a try. I am going to demonstrate how you can leverage two NuGet packages so you can have basic management of your infrastructure as code with C#. The two libraries that I am going to use are the Azure Management SDK for .NET and Bullseye for creating tasks to execute. This code will be a simple example, and we will have a solution with a web app project and an infrastructure project. We will create a resource group, app service plan, and app service to deploy our web app project.
Let’s get started creating our basic project.
$ mkdir iac
$ cd iac
$ dotnet new sln -n IacDemo
$ dotnet new console -o Infrastructure
$ dotnet sln add ./Infrastructure/Infrastructure.csproj
$ dotnet new webapp -o WebApp
$ dotnet sln add ./WebApp/WebApp.csproj
Okay, we have our basic project, let’s make sure it builds.
$ dotnet build IacDemo.sln
Microsoft (R) Build Engine version 16.2.32702+c4012a063 for .NET Core
Copyright (C) Microsoft Corporation. All rights reserved.

  Restore completed in 38.96 ms for ~\iac\Infrastructure\Infrastructure.csproj.
  Restore completed in 75.76 ms for ~\iac\WebApp\WebApp.csproj.
  Infrastructure -> ~\iac\Infrastructure\bin\Debug\netcoreapp2.2\Infrastructure.dll
  WebApp -> ~\iac\WebApp\bin\Debug\netcoreapp2.2\WebApp.dll
  WebApp -> ~\iac\WebApp\bin\Debug\netcoreapp2.2\WebApp.Views.dll

Build succeeded.
    0 Warning(s)
    0 Error(s)

Time Elapsed 00:00:08.21
Awesome! Now we need to add our NuGet packages to our Infrastructure.csproj.
$ cd ./Infrastructure
$ dotnet add package bullseye
$ dotnet add package Microsoft.Azure.Management.Fluent
$ dotnet add package Microsoft.Azure.Management.AppService.Fluent
Okay, setup is complete. Open the solution in your favorite editor and let’s get started creating some infrastructure as code with C#. We will do all our coding in Program.cs. We are going to start by creating three targets using bullseye, and these targets will be create, destroy, and deploy.
using System;

namespace Infrastructure {
    using static Bullseye.Targets;

    class Program {
        static void Main(string[] args) {
            Target("create", () => Console.WriteLine("Called create."));
            Target("destroy", () => Console.WriteLine("Called destroy."));
            Target("deploy", () => Console.WriteLine("Called deploy."));
            RunTargetsAndExit(args);
        }
    }
}
Let’s call one of the targets to make sure that it executes as expected.
$ dotnet run -- create
Bullseye: Starting... (create)
Bullseye/create: Starting...
Called create.
Bullseye/create: Succeeded. (7.94 ms)
Bullseye: ───────────────────────────────
Bullseye: Duration      Outcome    Target
Bullseye: ────────────  ─────────  ──────
Bullseye: 8 ms  100.0%  Succeeded  create
Bullseye: ───────────────────────────────
Bullseye: Succeeded. (create) (26.6 ms)
It looks like it is working, now we can start filling in our functionality. Let’s start by creating our infrastructure. We are going to begin by handling creating our Azure connection. This section is quick and dirty isn’t the proper way to handle your credentials. We will create our credentials, then use the Azure configure method to build out our Azure connection to our default subscription.
static IAzure AuthenticateAzure() {
    var creds = SdkContext.AzureCredentialsFactory.FromServicePrincipal("<client_id>", "<client_secret>", "<tenant>",
        AzureEnvironment.AzureGlobalCloud);

    return Azure.Configure()
        .WithLogLevel(HttpLoggingDelegatingHandler.Level.Basic)
        .Authenticate(creds)
        .WithDefaultSubscription();
}
Now its time to create our resources in code.
static void CreateResources(IAzure azure) {

    var region = Region.USEast;
    var tags = new Dictionary<string, string> {{"environment", "development"}};

    var resourceGroup = azure.ResourceGroups
        .Define("dotnet-eus-rg")
        .WithRegion(region)
        .WithTags(tags)
        .Create();

   var appServicePlan = azure.AppServices.AppServicePlans
        .Define("dotnet-eus-ap")
        .WithRegion(resourceGroup.Region)
        .WithExistingResourceGroup(resourceGroup)
        .WithFreePricingTier()
        .WithTags(tags)
        .Create();

   azure.AppServices.WebApps
        .Define("dotnet-eus-as")
        .WithExistingWindowsPlan(appServicePlan)
        .WithExistingResourceGroup(appServicePlan.ResourceGroupName)
        .WithTags(tags)
        .Create();
}
Since the delete is going to be simple, we will do it inline in our target. Let’s wire all of the targets up right now. Our main method should look like below. We will grab the azure connection and then execute the create resources method in the create target and the onliner delete in our destroy.
static void Main(string[] args) {
    var azure = AuthenticateAzure();

    Target("create", () => {
        CreateResources(azure);
    });

    Target("destroy", () => {
        azure.ResourceGroups.DeleteByName("dotnet-eus-rg");
    });

    RunTargetsAndExit(args);
}
Make sure to update the credentials and let’s execute our create.
$ dotnet run -- create
Bullseye: Starting... (create)
Bullseye/create: Starting...
Bullseye/create: Succeeded. (26.5 s)
Bullseye: ──────────────────────────────────
Bullseye: Duration         Outcome    Target
Bullseye: ───────────────  ─────────  ──────
Bullseye: 26.48 s  100.0%  Succeeded  create
Bullseye: ──────────────────────────────────
Bullseye: Succeeded. (create) (26.5 s)
Hmm, that took longer. Let’s go to the portal and see if we can see our infrastructure.
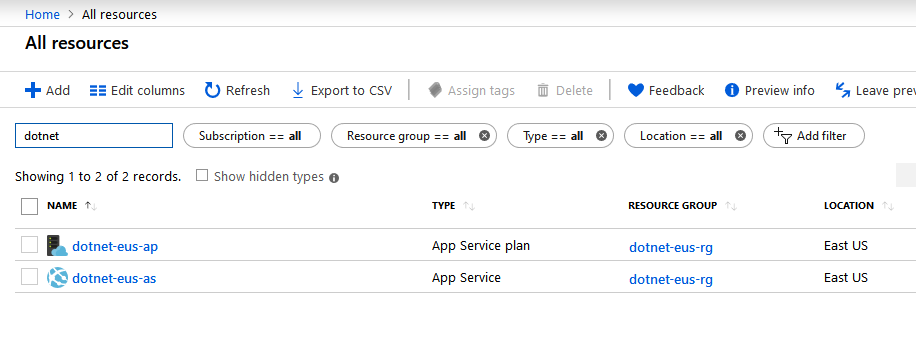
Yay! We created an infrastructure using C#. Now let’s test our destroy.
$ dotnet run -- destroy
Bullseye: Starting... (destroy)
Bullseye/destroy: Starting...
Bullseye/destroy: Succeeded. (2 min 48 s)
Bullseye: ──────────────────────────────────────
Bullseye: Duration            Outcome    Target
Bullseye: ──────────────────  ─────────  ───────
Bullseye: 2 min 48 s  100.0%  Succeeded  destroy                                                                                            Bullseye: ──────────────────────────────────────
Bullseye: Succeeded. (destroy) (2 min 48 s)
If you check in the portal, the resources will no longer be there. We have one step left, and that is to create a package and deploy it to Azure. Let’s look at our whole infrastructure as code.
using System.Collections.Generic;
using Microsoft.Azure.Management.Fluent;
using Microsoft.Azure.Management.ResourceManager.Fluent;
using Microsoft.Azure.Management.ResourceManager.Fluent.Core;

namespace Infrastructure {
    using static Bullseye.Targets;

    class Program {
        static void Main(string[] args) {
            var azure = AuthenticateAzure();

            Target("create", () => {
                CreateResources(azure);
            });

            Target("destroy", () => {
                azure.ResourceGroups.DeleteByName("dotnet-eus-rg");
            });

            RunTargetsAndExit(args);
        }

        static IAzure AuthenticateAzure() {
            var creds = SdkContext.AzureCredentialsFactory.FromServicePrincipal("<client_id>", "<client_secret>", "<tenant>",
                AzureEnvironment.AzureGlobalCloud);

            return Azure.Configure()
                .WithLogLevel(HttpLoggingDelegatingHandler.Level.Basic)
                .Authenticate(creds)
                .WithDefaultSubscription();
        }

        static void CreateResources(IAzure azure) {

            var region = Region.USEast;
            var tags = new Dictionary<string, string> {{"environment", "development"}};

            var resourceGroup = azure.ResourceGroups
                .Define("dotnet-eus-rg")
                .WithRegion(region)
                .WithTags(tags)
                .Create();

            var appServicePlan = azure.AppServices.AppServicePlans
                .Define("dotnet-eus-ap")
                .WithRegion(resourceGroup.Region)
                .WithExistingResourceGroup(resourceGroup)
                .WithFreePricingTier()
                .WithTags(tags)
                .Create();

            azure.AppServices.WebApps
                .Define("dotnet-eus-as")
                .WithExistingWindowsPlan(appServicePlan)
                .WithExistingResourceGroup(appServicePlan.ResourceGroupName)
                .WithTags(tags)
                .Create();
        }

        static void DestroyAllResources(IAzure azure) {
            azure.ResourceGroups.DeleteByName("dotnet-eus-rg");
        }
    }
}
All that is left is for us to create a PowerShell script that will deploy our infrastructure and publish our application. We will need to use the Azure CLI as I don’t see that it can be done with the Azure Management SDK, stay tuned. This script assumes at the root of the project directory and is saved as build.ps1.
dotnet build
dotnet publish -c release -o artifacts
Compress-Archive -Path .\WebApp\artifacts\* -DestinationPath app.zip
dotnet .\Infrastructure\artifacts\Infrastructure.dll create
az login --service-principal -u <client_id> -p <client_secret> --tenant <tenant>
webapp deployment source config-zip -g dotnet-eus-rg -n dotnet-eus-as --src app.zip
Now we need to execute it all together. I am assuming you have deleted your previous infrastructure.
$ ./build.ps1
That’s it for this post. There are tons of room for improvement like passing in the credentials to the infrastructure console app, logging output to the console, etc. What I do hope you take away is that you can do infrastructure as code in C# without any special tooling outside of the SDKs provided by Microsoft.
Thanks for reading,
Jamie
If you enjoy the content, then consider buying me a coffee.