Using smtp4dev in Kubernetes for Email Testing
Testing if your app is sending emails or notifications correctly is always challenging. I have witnessed and heard numerous stories over the years of accidents that mass email customers from a dev or a staging environment when doing testing. Now it’s easy to think that this can be avoided, everyone just wants to ensure that the actual SMTP code is working correctly due to its importance in any system. In the Windows and .NET space, I have been using the awesome smtp4dev by Rob Wood since it was originally released years ago. It allows you to run an SMTP server locally where you can send emails and then view those. The smtp4dev application was originally a Windows GUI app and then was moved to being a .NET Core application with a web UI. That migration allowed it to be used cross-platform on Linux, Windows, and Mac. It was also containerized, so it can be run using Docker or even in Kubernetes.
What I am going to do in this post is show you how to create a manifest for smtp4dev along with a service for use inside a Kubernetes cluster. I will be using a RKE2 cluster and this will work on any Kubernetes distribution including K3s, Minikube, and MicroK8s. Let’s get started defining our deployment.
Kubernetes Deployment Manifest
Now, smtp4dev provides Linux and Windows 2019 container images. We are going to add a node affinity to limit our deployment to just Linux nodes. We are going to do these limit issues if you only have Linux nodes or don’t have any Windows Server 2019 nodes running in your cluster. Let’s define our deployment first making sure that we expose ports 80 and 25 for the web interface and the SMTP.
apiVersion: apps/v1
kind: Deployment
metadata:
  name: smtp4dev
  labels:
    app: smtp4dev
spec:
  replicas: 1
  selector:
    matchLabels:
      app: smtp4dev
  template:
    metadata:
      labels:
        app: smtp4dev
    spec:
      affinity:
        nodeAffinity:
          requiredDuringSchedulingIgnoredDuringExecution:
            nodeSelectorTerms:
              - matchExpressions:
                  - key: kubernetes.io/os
                    operator: In
                    values:
                      - linux
      containers:
        - name: smtp4dev
          image: rnwood/smtp4dev:3.1.3-ci20211206101
          ports:
            - containerPort: 80
            - containerPort: 25
Now we should define our service to expose our SMTP port and web interface.
apiVersion: v1
kind: Service
metadata:
  name: smtp4dev
spec:
  selector:
    app: smtp4dev
  ports:
    - name: smtp
      protocol: TCP
      port: 25
      targetPort: 25
    - name: http
      protocol: TCP
      port: 80
      targetPort: 80
Finally, we can put this all together as a single manifest.
apiVersion: v1
kind: Service
metadata:
  name: smtp4dev
spec:
  selector:
    app: smtp4dev
  ports:
    - name: smtp
      protocol: TCP
      port: 25
      targetPort: 25
    - name: http
      protocol: TCP
      port: 80
      targetPort: 80
---
apiVersion: apps/v1
kind: Deployment
metadata:
  name: smtp4dev
  labels:
    app: smtp4dev
spec:
  replicas: 1
  selector:
    matchLabels:
      app: smtp4dev
  template:
    metadata:
      labels:
        app: smtp4dev
    spec:
      affinity:
        nodeAffinity:
          requiredDuringSchedulingIgnoredDuringExecution:
            nodeSelectorTerms:
              - matchExpressions:
                  - key: kubernetes.io/os
                    operator: In
                    values:
                      - linux
      containers:
        - name: smtp4dev
          image: rnwood/smtp4dev:3.1.3-ci20211206101
          ports:
            - containerPort: 80
            - containerPort: 25
Applying the Manifest
We have finished the manifest, and now we can apply it. I have posted this as a GitHub gist here. So you can apply it by referencing the gist.
kubectl apply -f https://gist.githubusercontent.com/phillipsj/89cd60559820fd3b8bf72a76e9bf90f0/raw/a077b5cb811c4f5aade2547f8c180c8c2b0b2c45/smtp4dev-manifest.yaml
Let’s check that it deployed successfully.
$ kubectl get deployments
NAME       READY   UP-TO-DATE   AVAILABLE   AGE
smtp4dev   1/1     1            1           2m57s
And we can check our service.
$ kubectl get service
NAME         TYPE        CLUSTER-IP      EXTERNAL-IP   PORT(S)         AGE
smtp4dev     ClusterIP   10.43.226.149   <none>        25/TCP,80/TCP   3m13s
If we navigate to our HTTP service endpoint we can see the web interface. I am using Rancher which makes this easier.

One item is remaining which is to actually send an email and make sure that it shows up. We will do that next.
Testing it all
Okay, to test this we will deploy a PowerShell Linux pod that will start and send the email. Here is that pod:
apiVersion: v1
kind: Pod
metadata:
name: pwsh
spec:
affinity:
nodeAffinity:
requiredDuringSchedulingIgnoredDuringExecution:
nodeSelectorTerms:
- matchExpressions:
- key: kubernetes.io/os
operator: In
values:
- linux
containers:
- name: pwsh
image: mcr.microsoft.com/powershell:latest
command:
- "pwsh"
- "-Command"
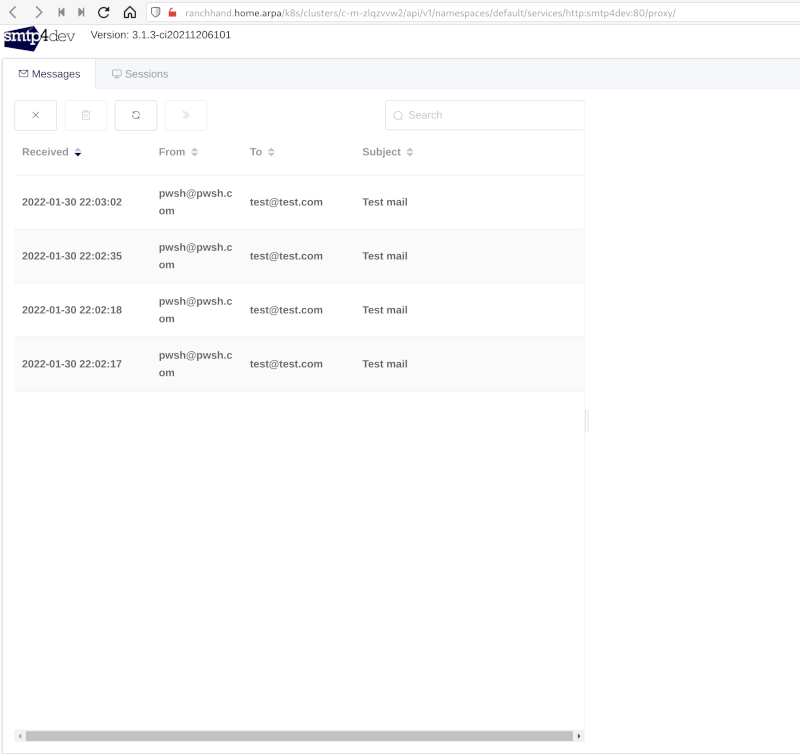
- "Send-MailMessage -From 'pwsh@pwsh.com' -To 'test@test.com' -Subject 'Test mail' -SmtpServer 'smtp4dev'"
Let’s check the web interface for smtp4dev and see if the emails are going to show up.
Wrapping Up
I have found smtp4dev a great tool to have around for testing that emails are working in systems. This post showed you all how you can deploy it within your Kubernetes cluster for testing applications and services that need to connect to an SMTP server.
Thanks for reading,
Jamie
If you enjoy the content then consider buying me a coffee.